http://cs5tutorial.net/how-to-create-a-clean-and-colorful-web-layout-%E2%80%93-photoshop-tutorial/
 Create a new document (Ctrl+N) in Photoshop with the size 1200px by 750px. Then select the Gradient Tool (G) and draw a gradient #792700 to #000000 from the top to the bottom of your document.
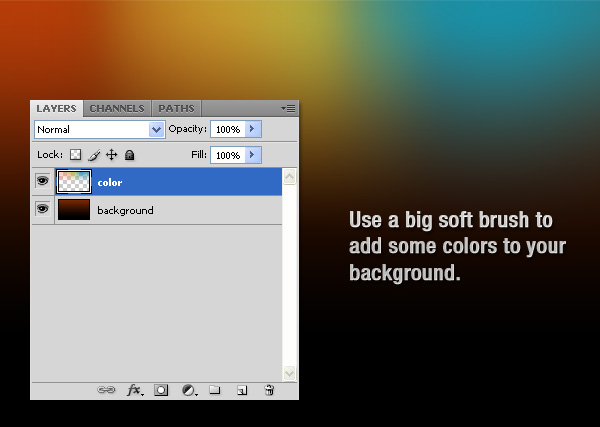 Create a new layer, select the Brush Tool (B), select a soft brush with the diameter 300px and add some colors to your layout. I have used red, orange and blue. Name this layer “color.”
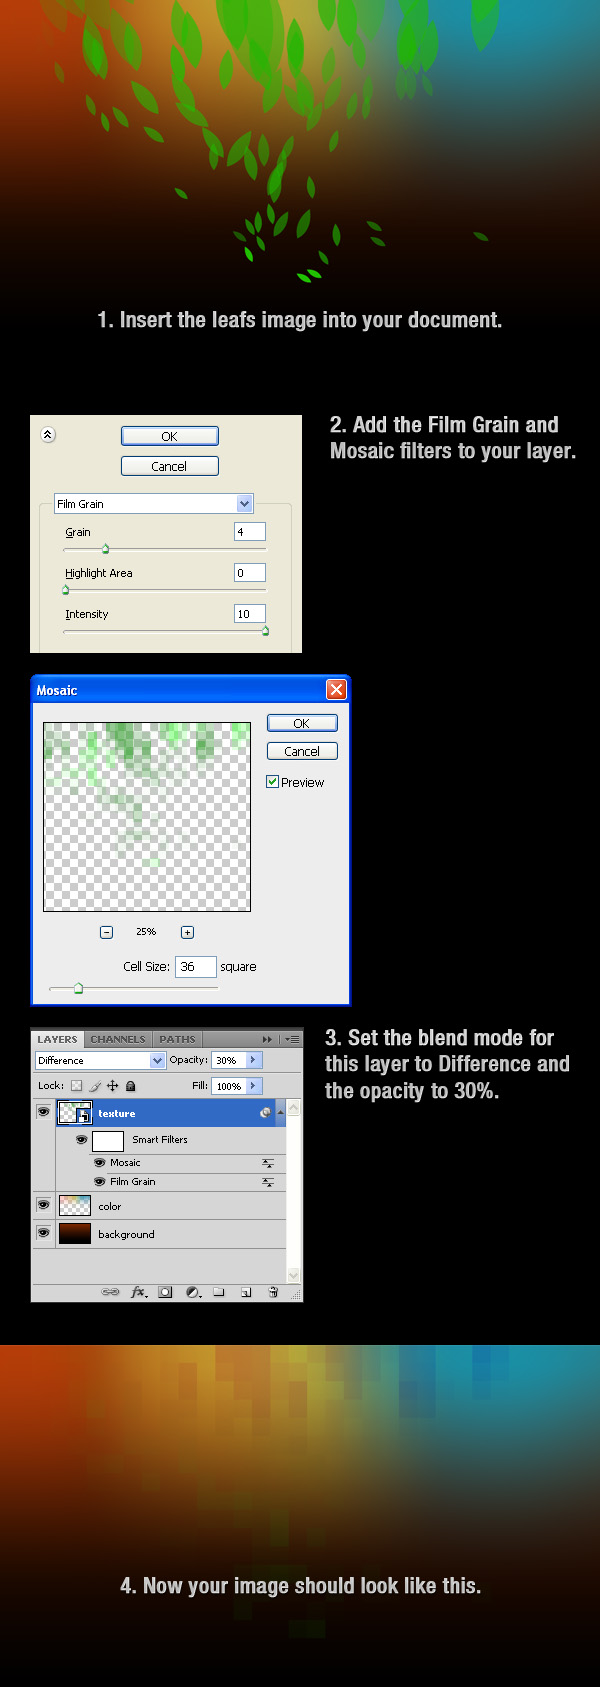 Now we are going to create a texture for our background. Open in Photoshop the leafs image which you have downloaded at the beginning of the tutorial and move it into your document using the Move Tool (V). Right-click on this layer and select Convert to Smart Object. Then go to Filter > Artistic > Film Grain and use the settings from the following image. Then go to Filter > Pixelate > Mosaic, and again use the settings from the following image. Set the blend mode for this layer to Difference, the opacity to 30% and name it “texture”
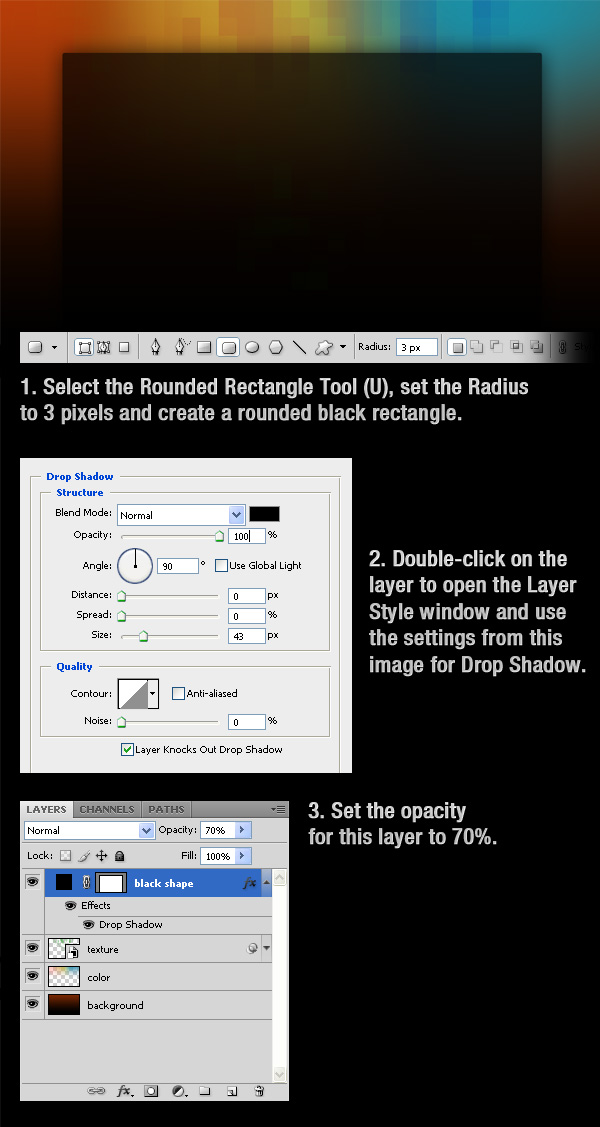 Create a new layer, select the Rounded Rectangle Tool (U), set the Radius to 3 pixels and create a rounded black rectangle. Then double-click on this layer to open the Layer Style window and use the settings from the following image for Drop Shadow. Set the opacity of this layer to 70% and name it “black shape.”
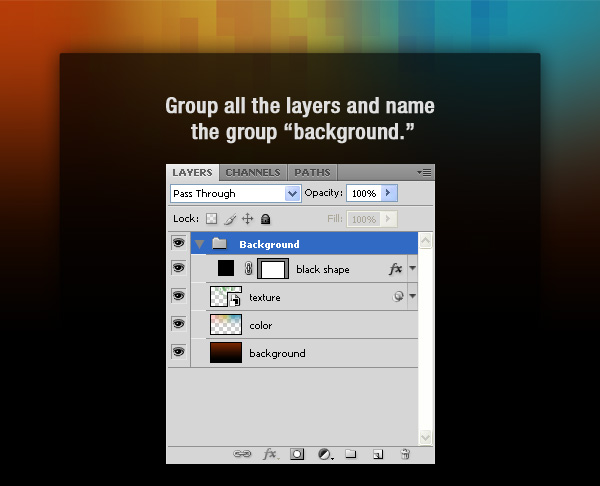 Hold down the Ctrl key and select all the layers which you have created until now and then group them (Ctrl+G). Name the group “background.”
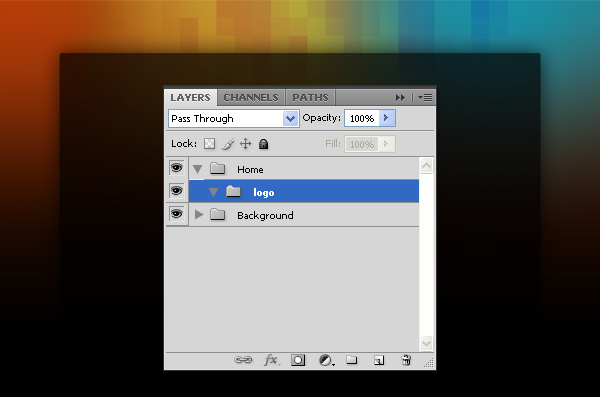 Create a new group (Layer > New > Group) and name it “home.” Then create another group inside the “home” group and name it “logo.”
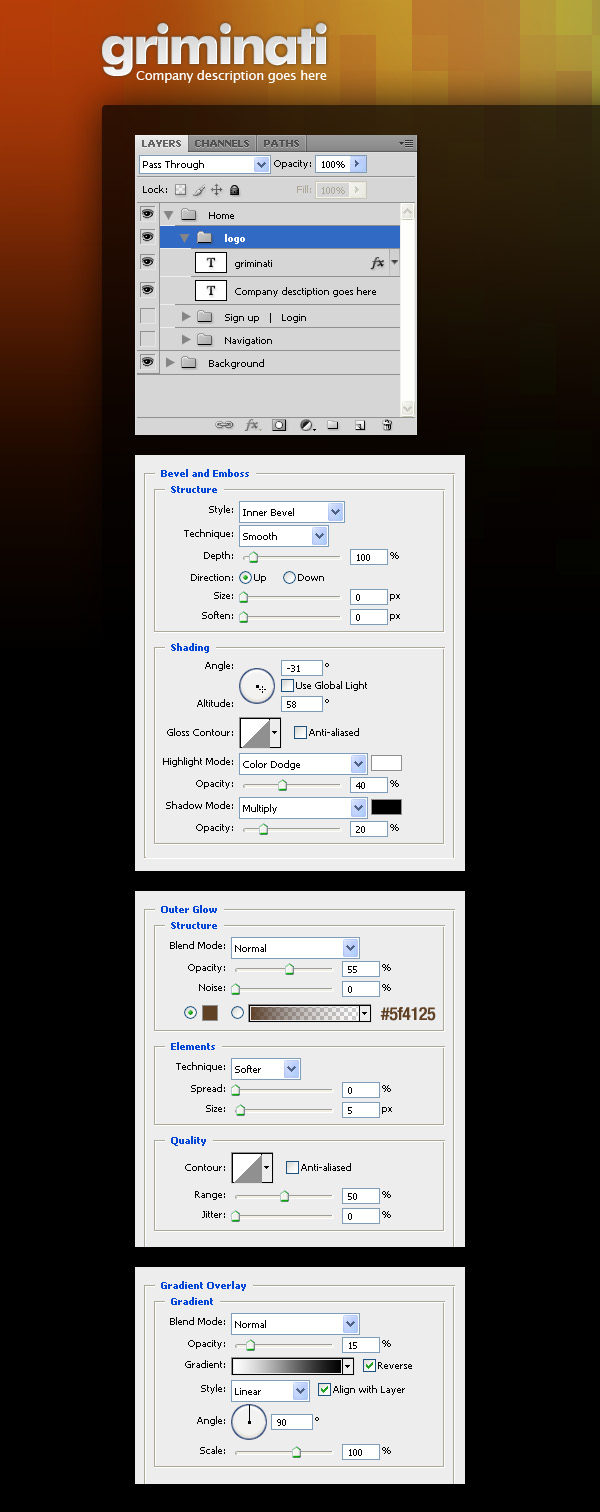 Create a new layer inside the “logo” group. Then select the Type Tool (T) and write the name of your layout using the color #f4f4f4. Double-click on this layer to open the Layer Style window and use the settings from the following image. Then create a new layer and write a tagline using the color #eeeeee.
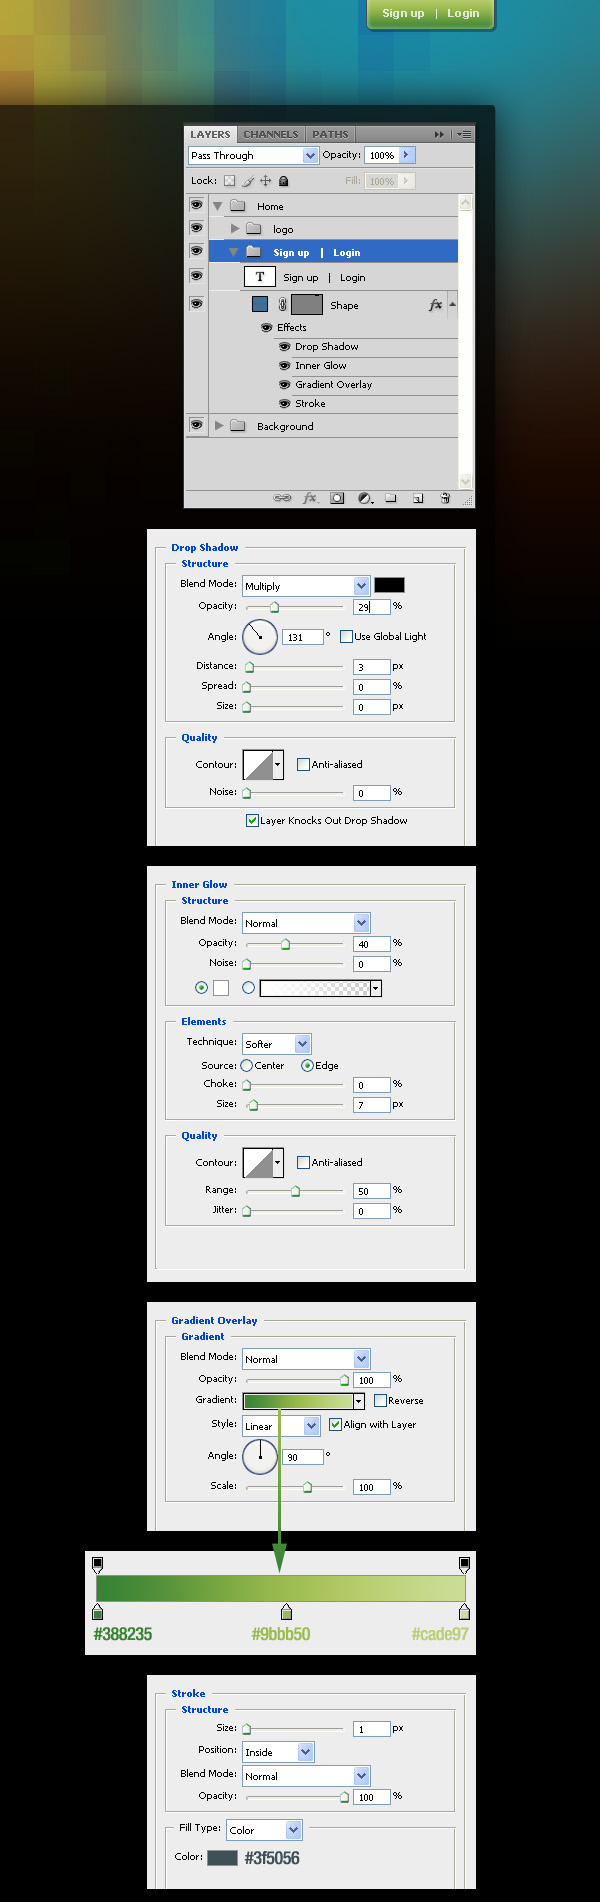 Now we are going to create two buttons in the upper right corner of our layout. Create a new group and name it “Sign up | Login.” Then select the Rounded Rectangle Tool (U) and create a rounded rectangle like I did. Double-click on the shape’s layer to open the Layer Style window and use the settings from the following image. Set the foreground color to white and use the Type Tool (T) to write the words “Sign up | Login” on your button. Set the opacity of the text layer to 75%.
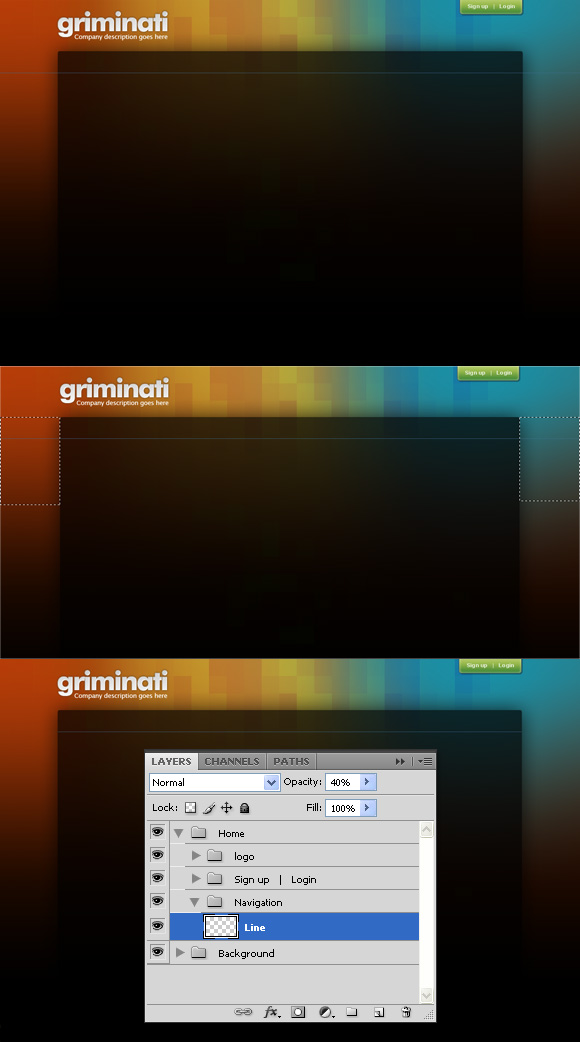 Create a new group and name it “Navigation.” Create a new layer, select the Single Row Marquee Tool and click once on your document to create a selection with the height of 1px. Fill that selection with the color #406f94 and delete what is outside of the black rectangle using the Rectangular Marquee Tool (M). Set the opacity of this layer to 40% and name it “Line.”
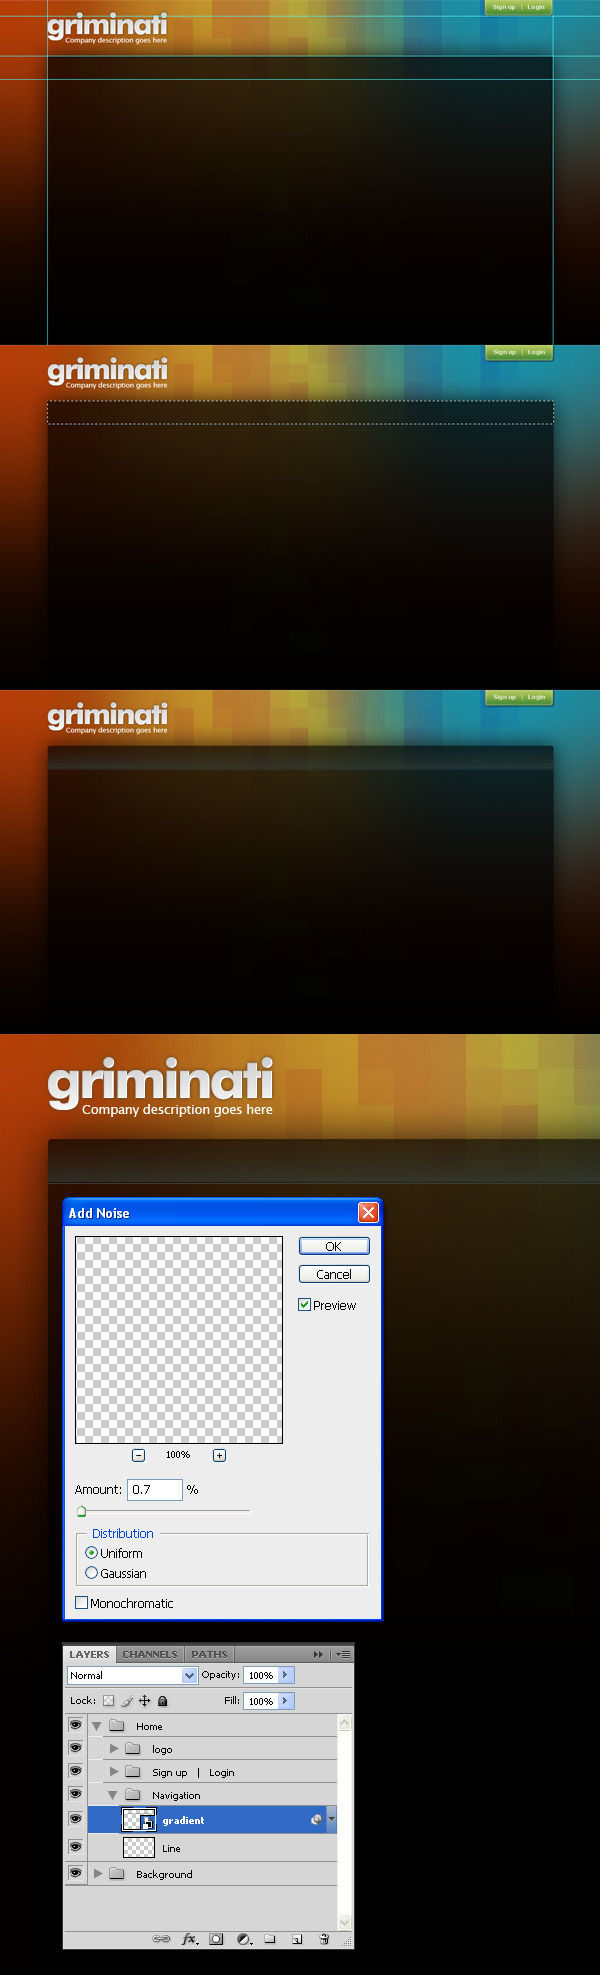 Create a new layer, select the Rectangular Marquee Tool (M) and create a selection like I did (note: you can use some guides to help you create the selection). Then select the Gradient Tool (G) and draw a gradient #35423e to transparent from the bottom to the top of the selection. Hit Ctrl+D to deselect. Then go to Filter > Noise > Add Noise and use the settings from the following image. Name this layer “gradient” and leave a distance of 1 pixel between the line and the gradient.
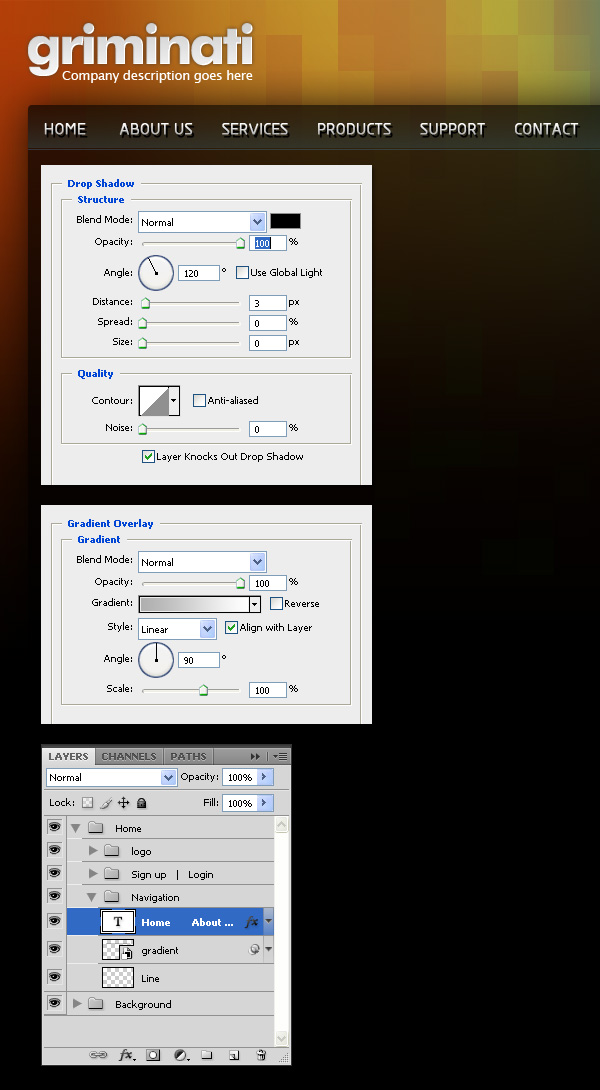 Select the Type Tool (T) and write the names of your layout’s pages in the navigation bar. Then double-click on the text layer to open the Layer Style window and use the settings from the next image. The font which I have used is called Greyscale Basic.
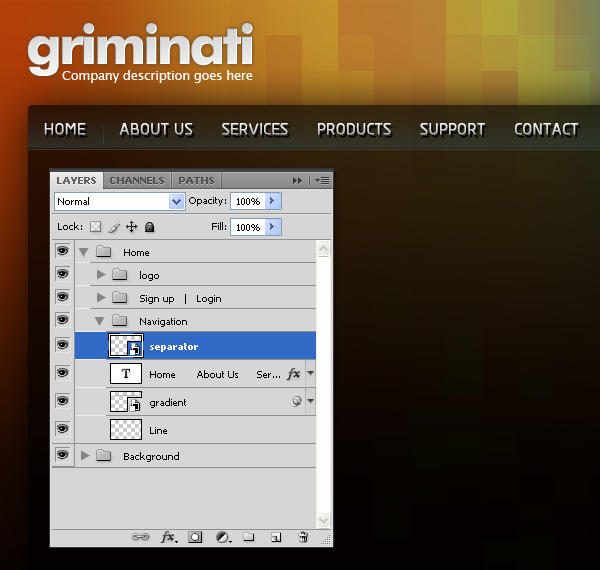
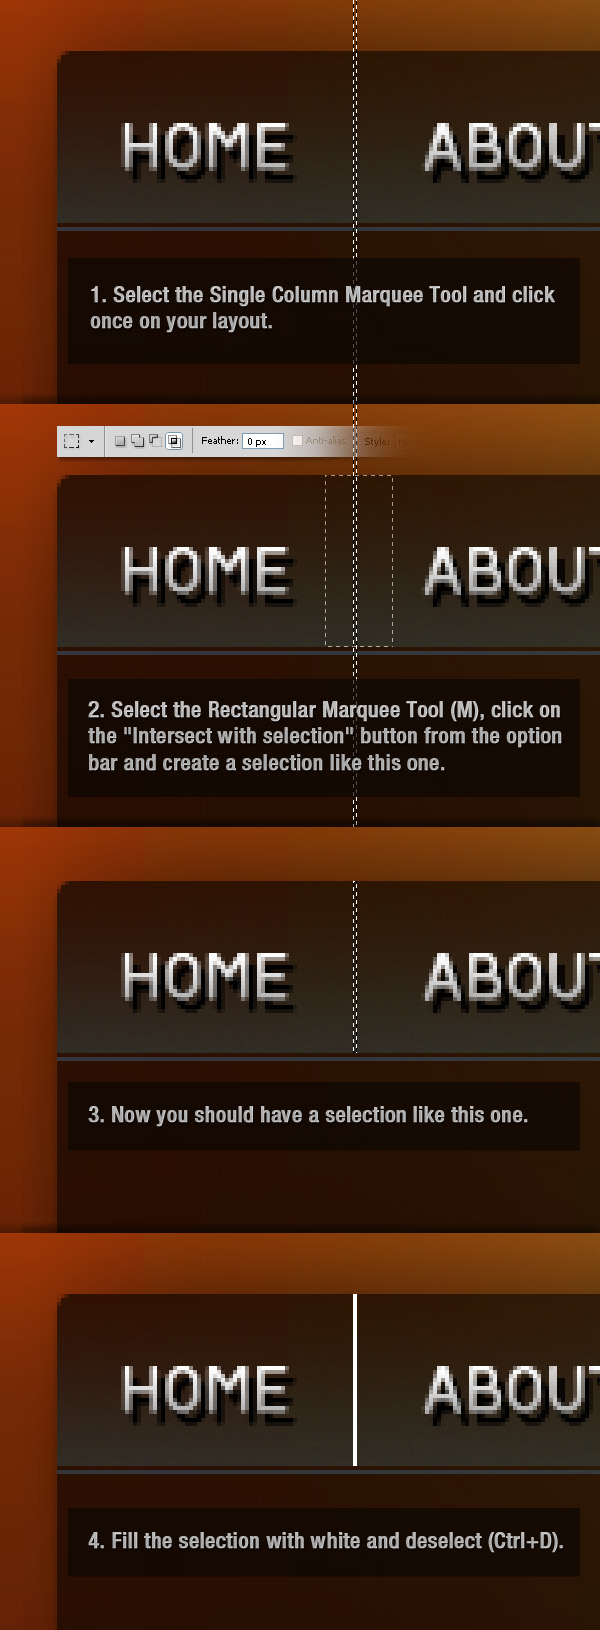 Now we are going to create a separator. Create a new layer, select the Single Column Marquee Tool and click once on your layout. Then select the Rectangular Marquee Tool (M), click on the “Intersect with selection” button from the option bar and create a selection like the one from the next image. Fill the selection with white and hit Ctrl+D to deselect.
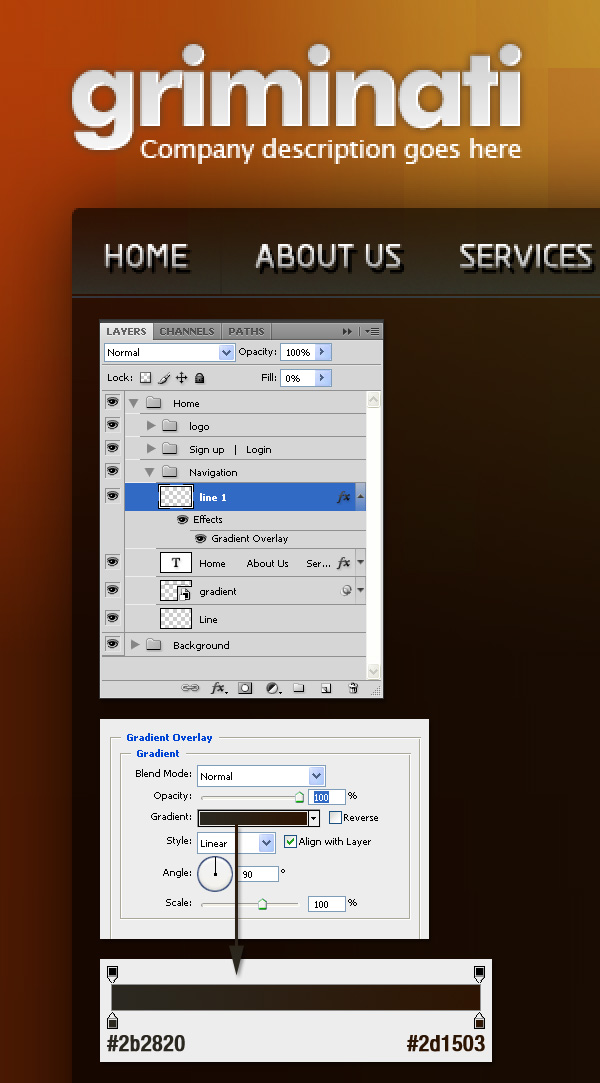 Double-click on the layer which you have created at the previous step to open the Layer Style window and use the settings from the following image. Name this layer “line 1.”
 Duplicate the “line 1″ layer (Ctrl+J) and name the new layer “line 2.” Select the Move Tool (V) and hit once the right arrow on your keyboard to move this layer 1 pixel to the right. Then double-click on the “line 2″ layer to open the Layer Style window and use the settings from the following image.
 Hold down the Ctrl key and select the “line 1″ and “line 2″ layers. Then right-click on one of them and select Convert to Smart Object. Name the smart object “separator.”
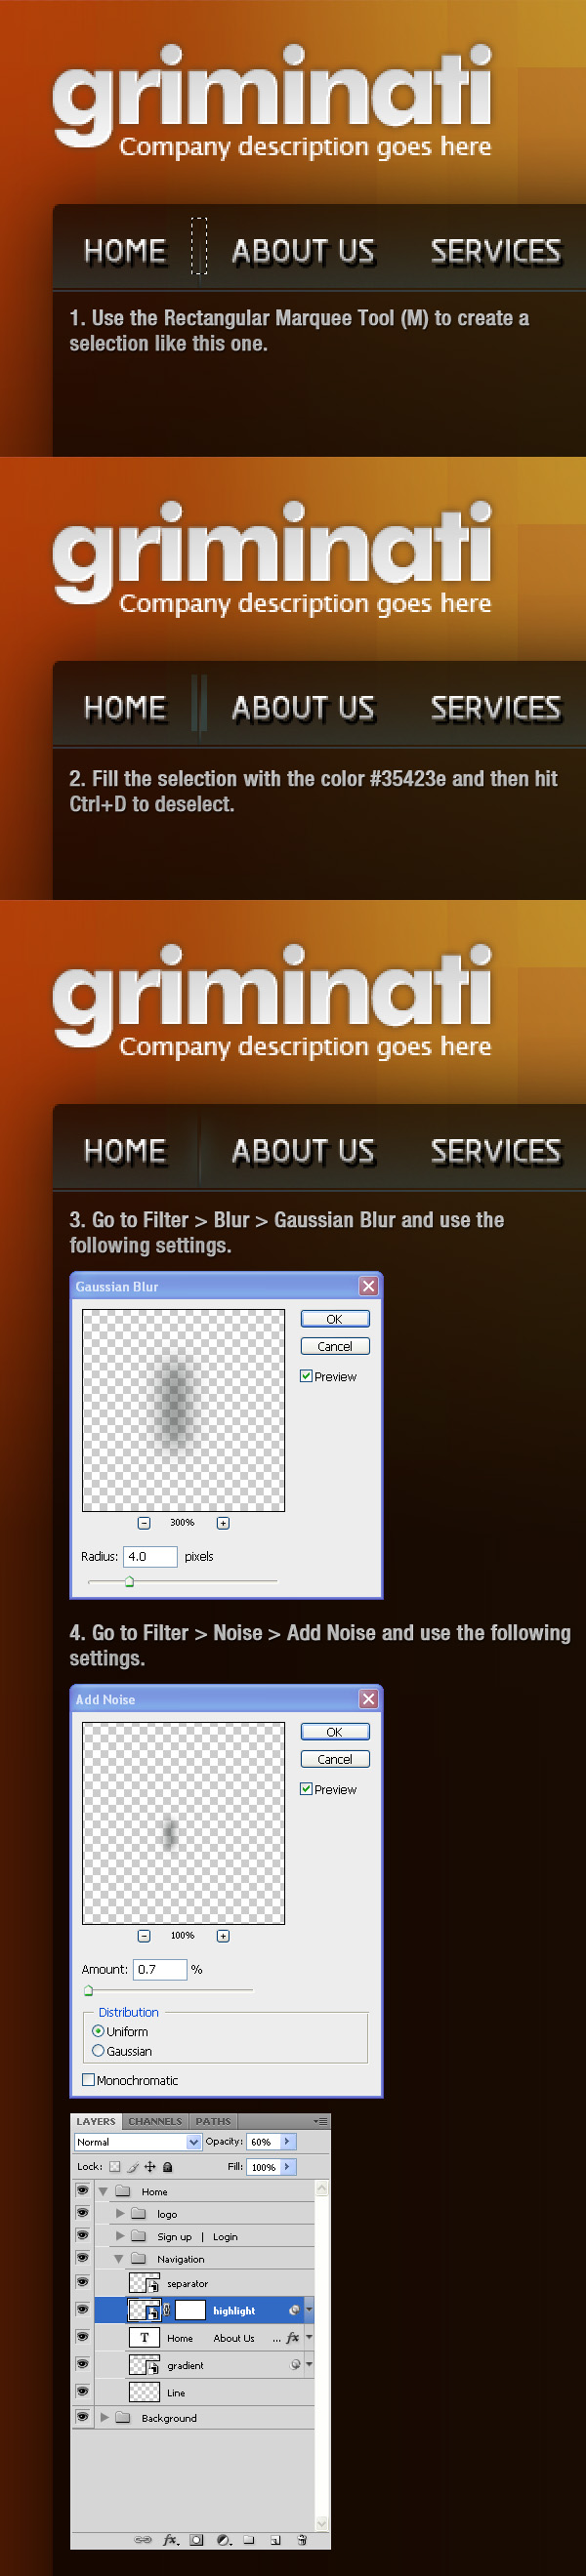 Create a new layer beneath the “separator” layer. Select the Rectangular Marquee Tool (M), create a selection like the one from the following image and fill it with the color #35423e. Right-click on this layer and select Convert to Smart Object. Go to Filter > Blur > Gaussian Blur and use the settings from the next image. Then go to Filter > Noise > Add Noise and again use the settings from the following image. Set the opacity of this layer to 60% and name it “highlight.”
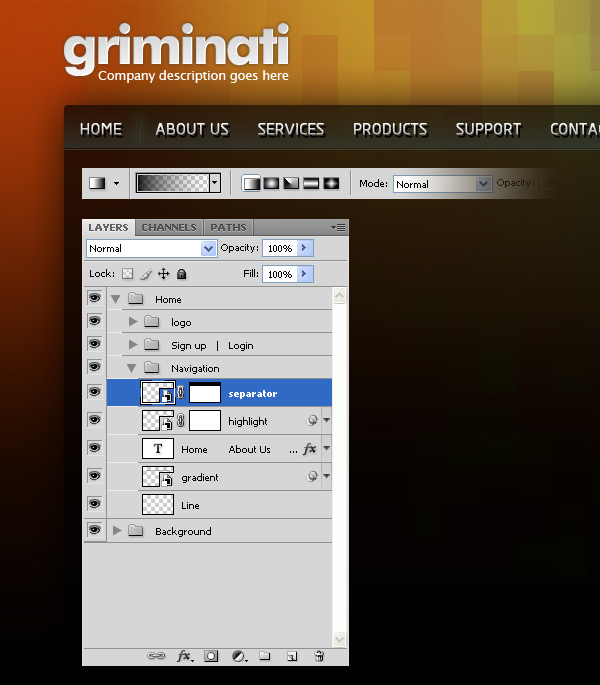 Click on the “separator” layer in the Layers palette to select it and then go to Layer > Layer Mask > Reveal All. Select the Gradient Tool (G) and draw a black to transparent gradient from the top to the middle of your separator.
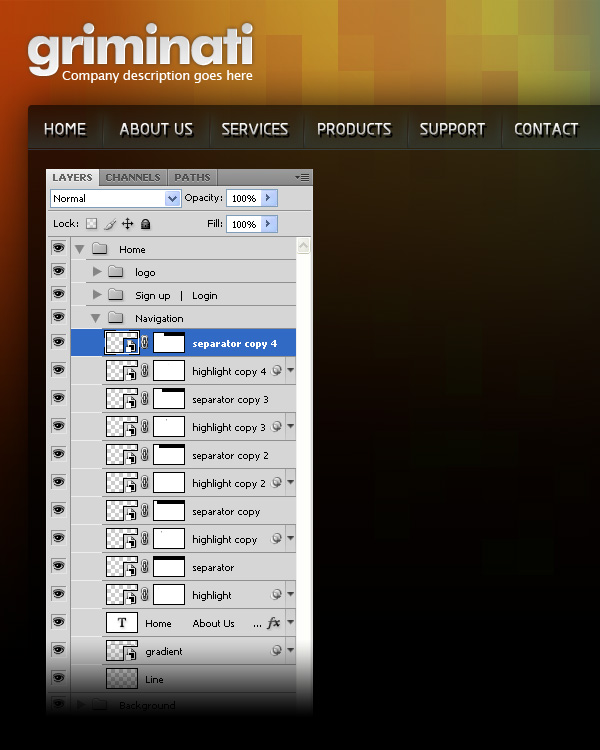 Hold down the Ctrl key and click on the “separator” and “highlight” layers in the Layers palette to select them. Then select the Move Tool (V), hold down the Alt and Shift keys and then click on your document and drag the mouse. Now you have duplicated the selected layers. Use the Move Tool (V) to move these new layers to the right. Repeat this step and create as many separators as you need.
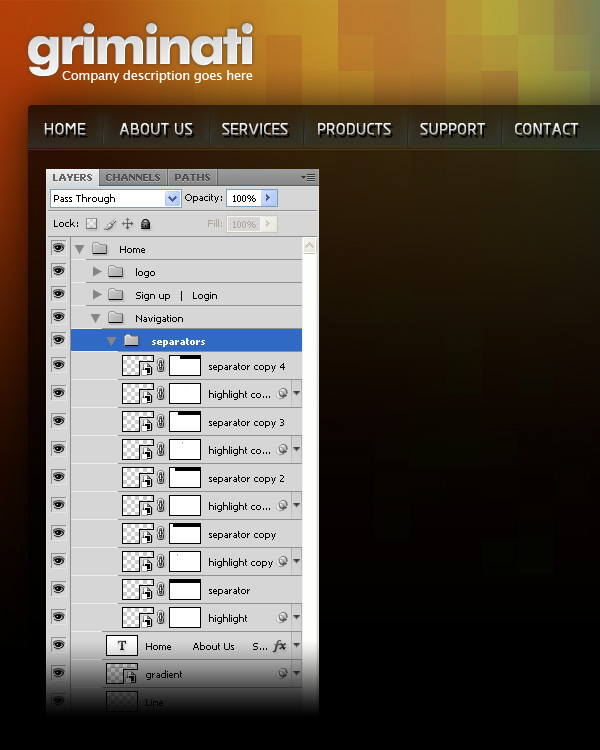 Select all the “separator” and “highlight” layers in the Layers palette and hit Ctrl+G to group them. Name the group “separators.”`
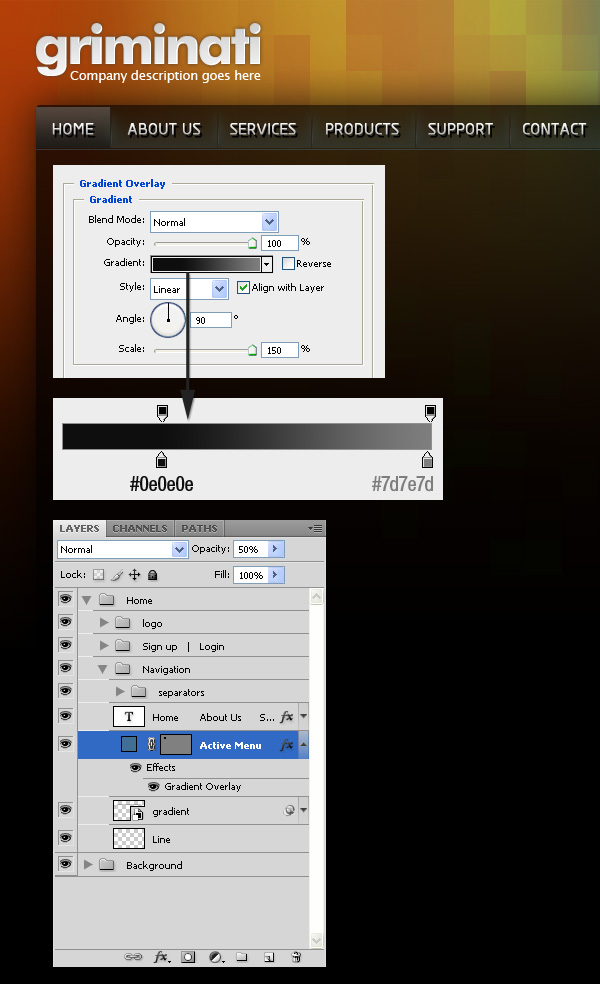 Now we are going to create a background for the active menu page to differentiate it from the others. Select the Rectangle Tool (U) and create a rectangle like I did. Put this layer beneath the text layer which contains all the pages names. Double-click on this layer and use the settings from the following image for Gradient Overlay. Then name it “active menu” and set its opacity to 50%.
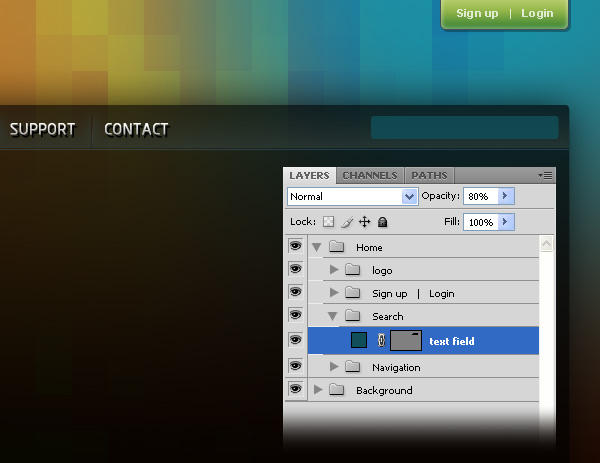 Create a new group (Layer > New > Group), name it “search” and put it above the “navigation” group. Select the Rounded Rectangle Tool (U), set the Radius to 3 px and create a rounded rectangle like I did using the color #104f59. Name this layer “text field” and set its opacity to 80%.
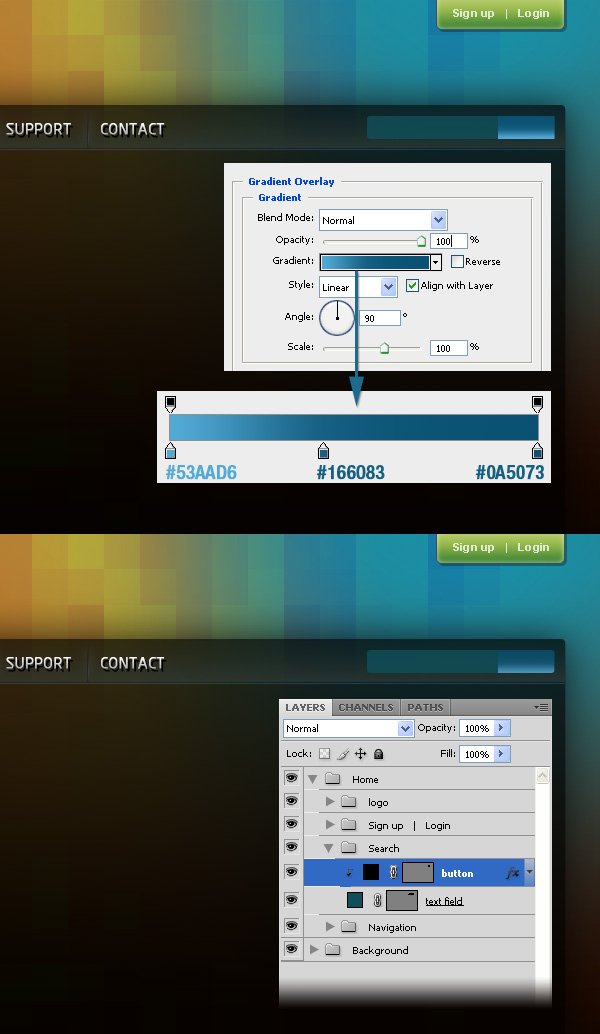 Select the Rectangle Tool (U) and create a rectangle like I did. Put this rectangle in the right side of the search bar. Double-click on this layer and use the settings from the following image for Gradient Overlay. Then right-click on this layer and select Create Clipping Mask.
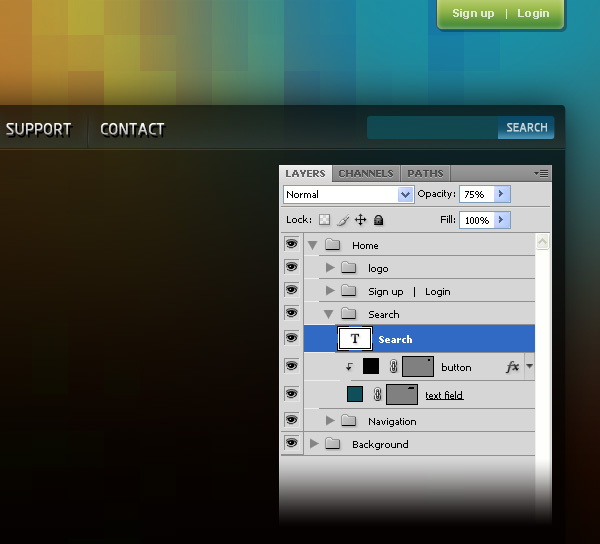 Select the Type Tool (T) and write the word “search” using the white color. Set the opacity of this layer to 75%.
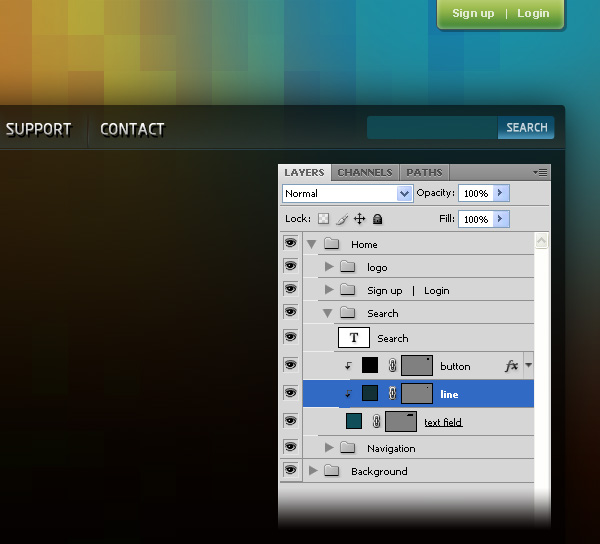 Select the Line Tool (U) and create a vertical line using the color #123036. Name this layer “line”, put it beneath the “button” layer and move it between the search bar and the button using the Move Tool (V).
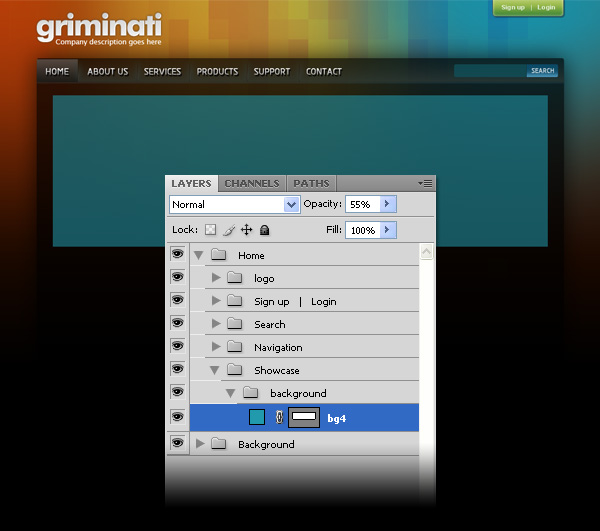 Create a new group (Layer > New > Group) and name it “Showcase.” Create another group inside this one and name it “background.” Select the Rectangle Tool (U) and create a rectangle using the color #219aad. My rectangle is 983 px wide by 273 px height (you may want to open the Info palette - Window > Info – before you create the rectangle, so you can see the exact size of your rectangle). Set the opacity of this layer to 55% and name it “bg4.”
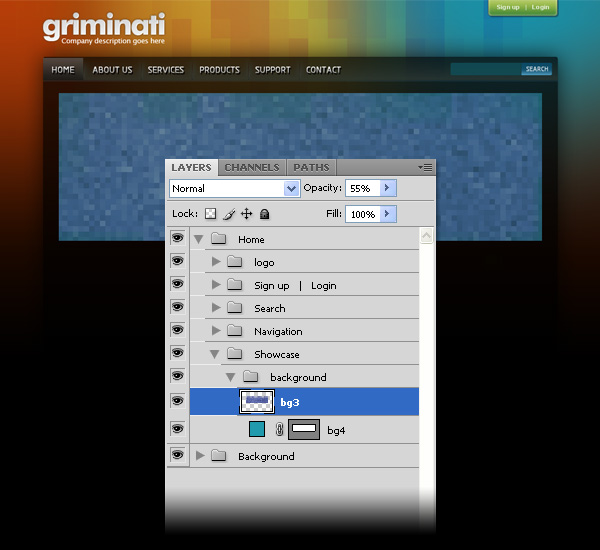 Open in Photoshop the “pixelated blue rectangle” image, move it into your document and put this image above your blue rectangle. Set the opacity of this layer to 55% and name it “bg3.”
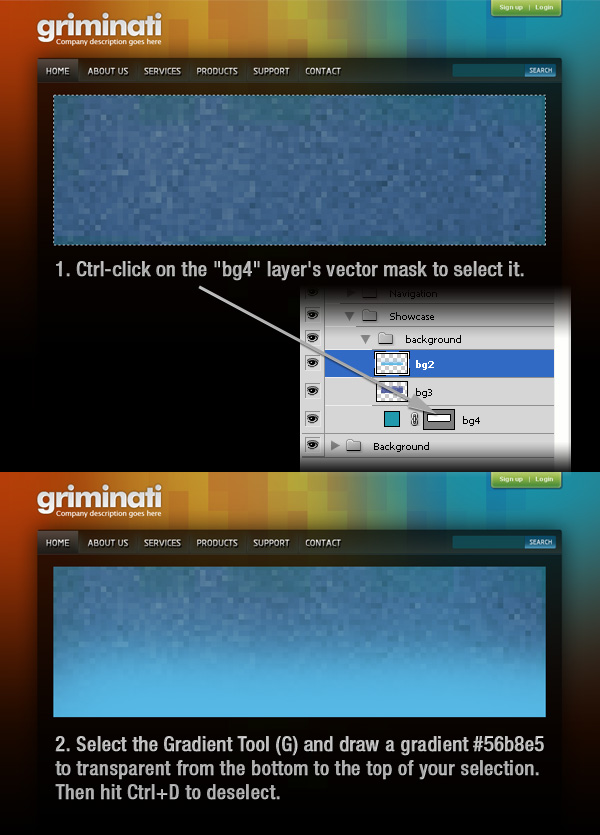 Ctrl-click on the “bg4″ layer’s vector mask to select it, then create a new layer, select the Gradient Tool (G) and draw a gradient #56b8e5 to transparent from the bottom to the top of your selection. Then hit Ctrl+D to deselect.
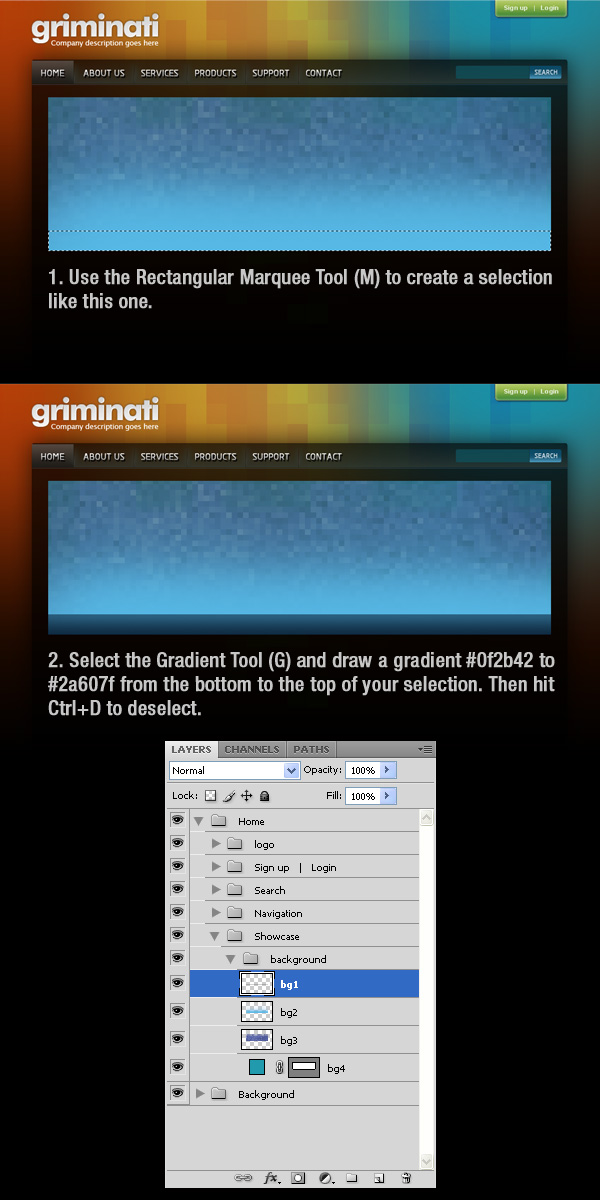 Create a new layer, select the Rectangular Marquee Tool (M) and create a selection like I did. Select the Gradient Tool (G) and draw a gradient #0f2b42 to #2a607f from the bottom to the top of your selection. Then hit Ctrl+D to deselect. Name this layer “bg1.”
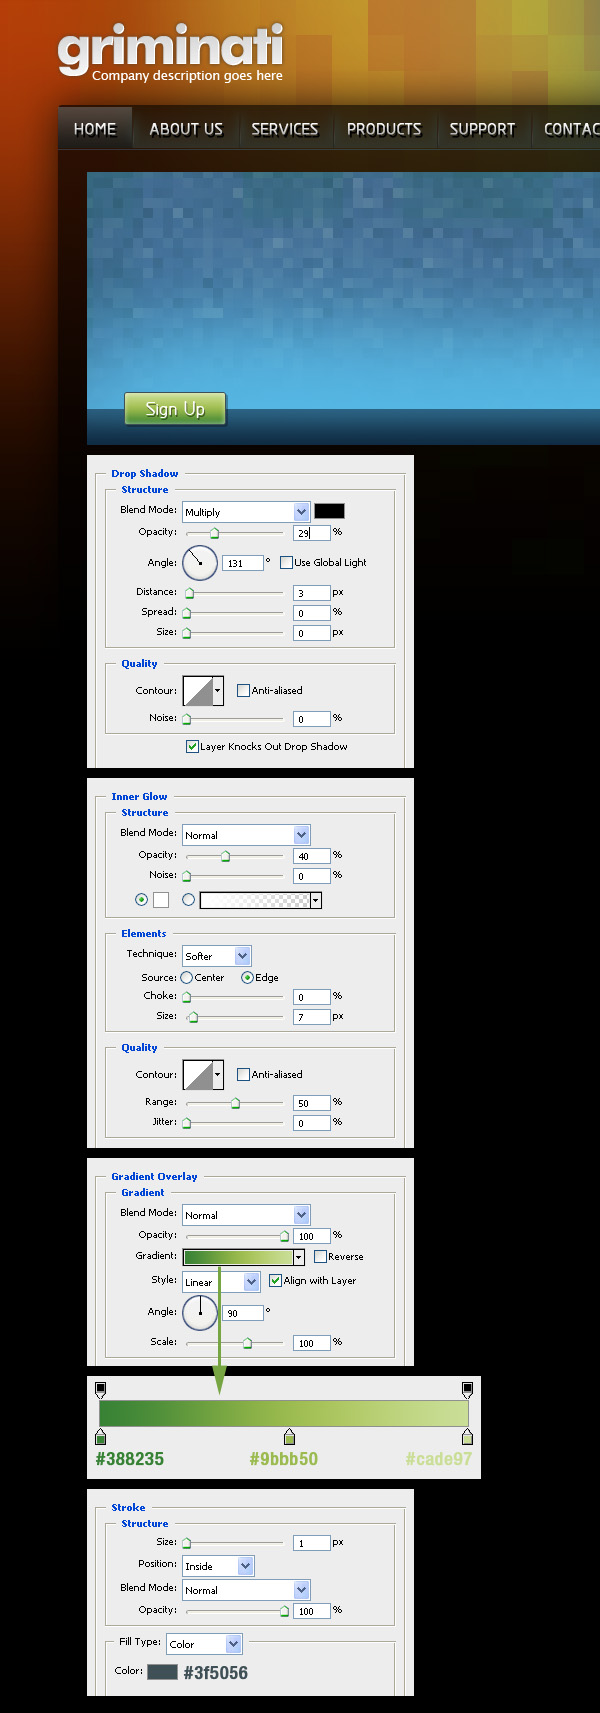 Create a new group (Layer > New > Group) and name it “sign up button.” Select the Rounded Rectangle Tool (U), set the Radius to 2 px and create a rounded rectangle like I did. Double-click on this layer to open the Layer Style window and use the settings from the following image. Then select the Type Tool (T) and write the words “sign up” using the white color.
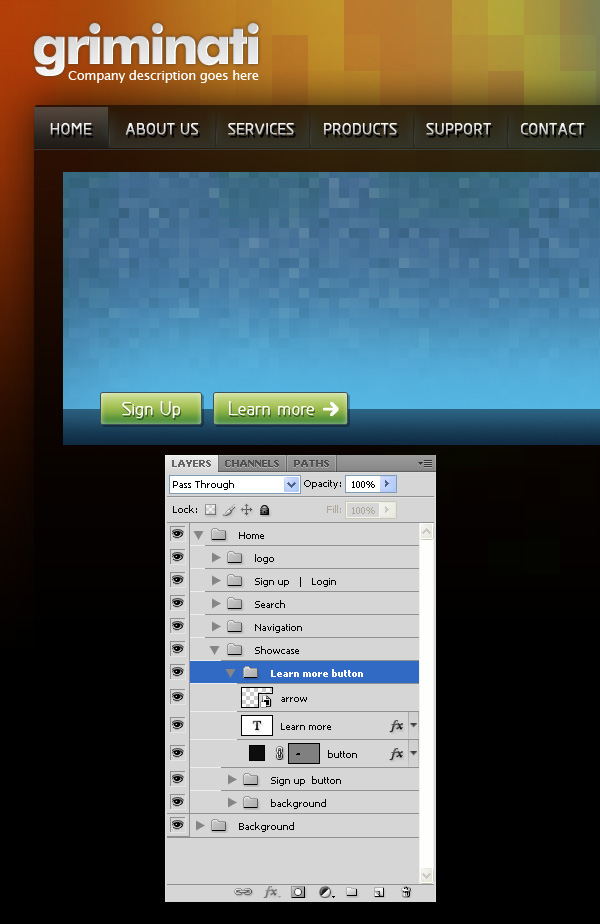 Repeat the previous step to create another button, but this time write the words “learn more” on your button. Then create a new layer, select the Custom Shape Tool (U) and create a white arrow like I did.
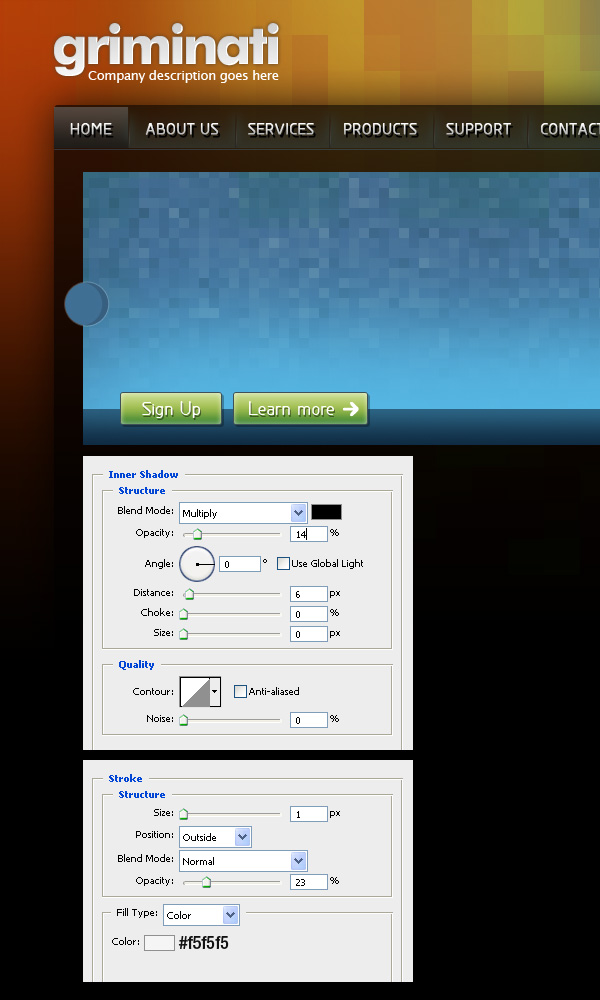 Create a new group (Layer > New > Group) and name it “left arrow.” Select the Ellipse Tool (U) and create a circle using the color #406f94. Double-click on this layer to open the Layer Style window and use the settings from the following image.
 Create a new layer and use the Custom Shape Tool (U) to create a white arrow. Double-click on this layer to open the Layer Style window and use the settings from the following image. Set the opacity of this layer to 50%.
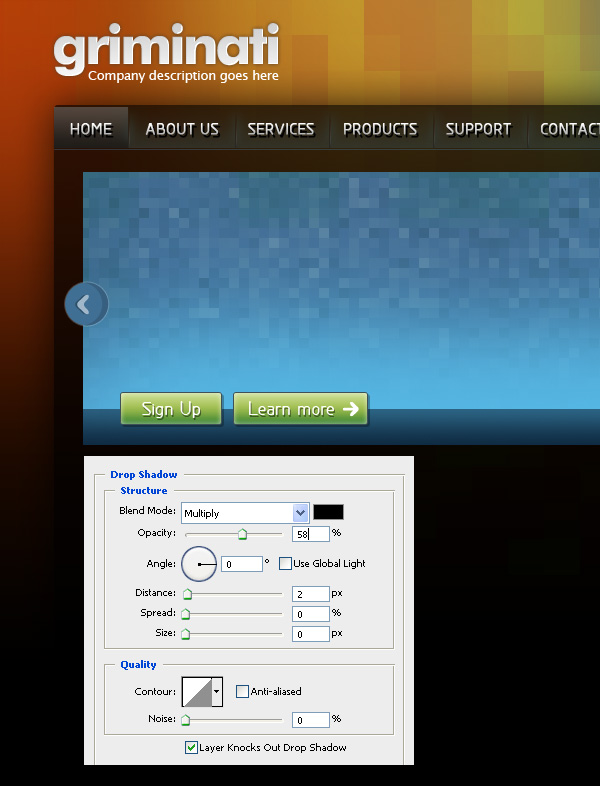
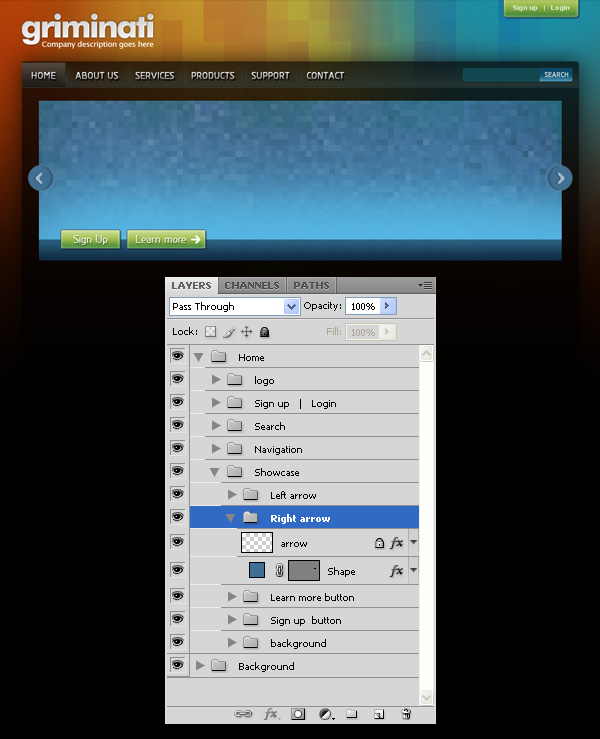 Repeat the previous two steps to create another arrow in the right side of the blue rectangle.
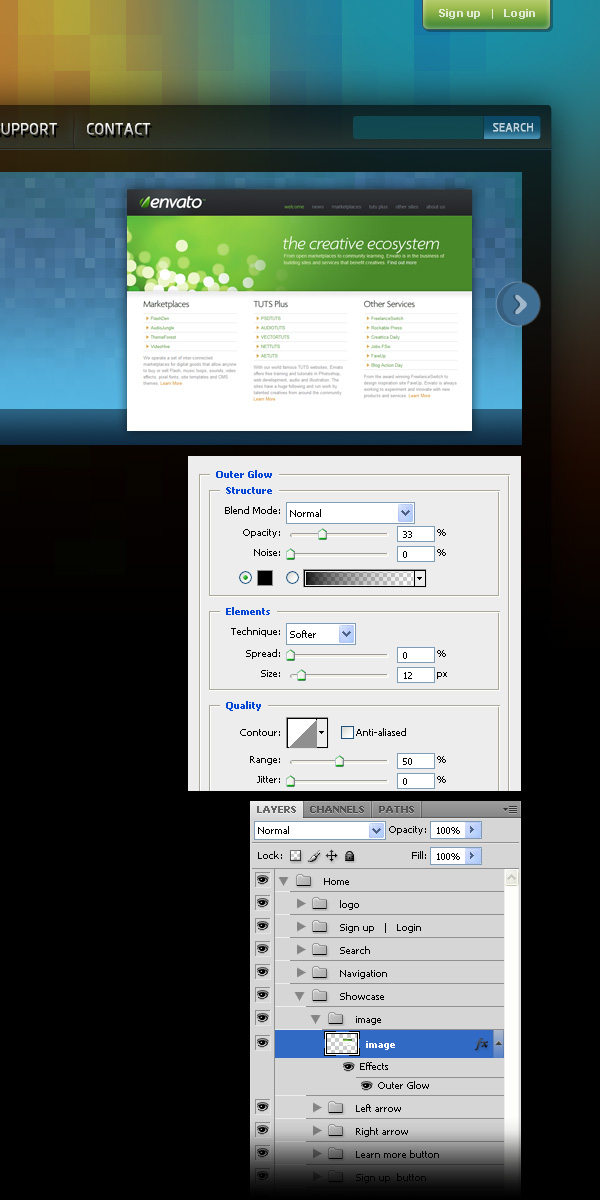 Create a new group (Layer > New > Group) and name it “image.” Put a small image in this group and name the layer “image.” Double-click on this layer to open the Layer Style window and use the settings from the following image.
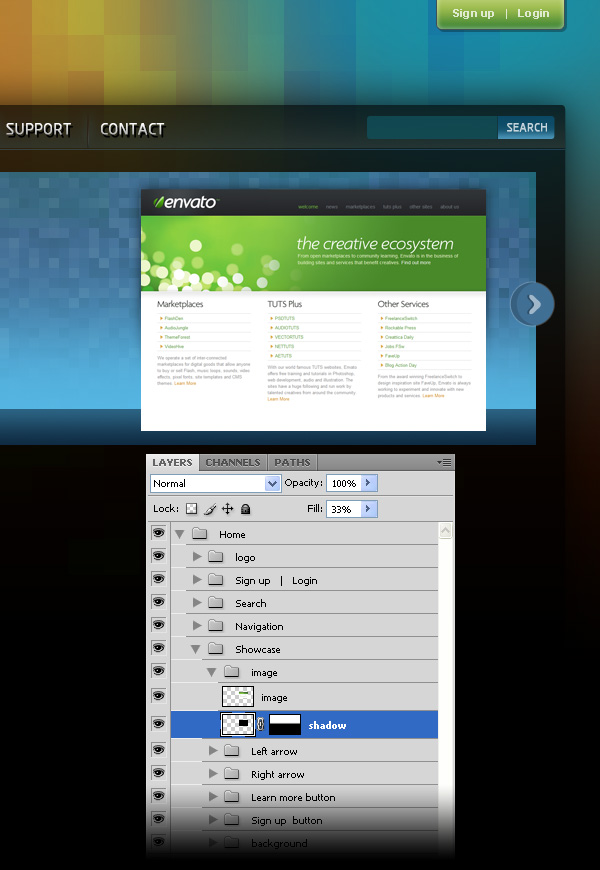 Go to Layer > Layer Style > Create Layer. This will create a new layer beneath the original one with the style of that original layer. Now go to Layer > Layer Mask > Reveal All, select the Gradient Tool (G) and draw a black to transparent gradient from the bottom to the middle of your small image. Name this layer “shadow.”
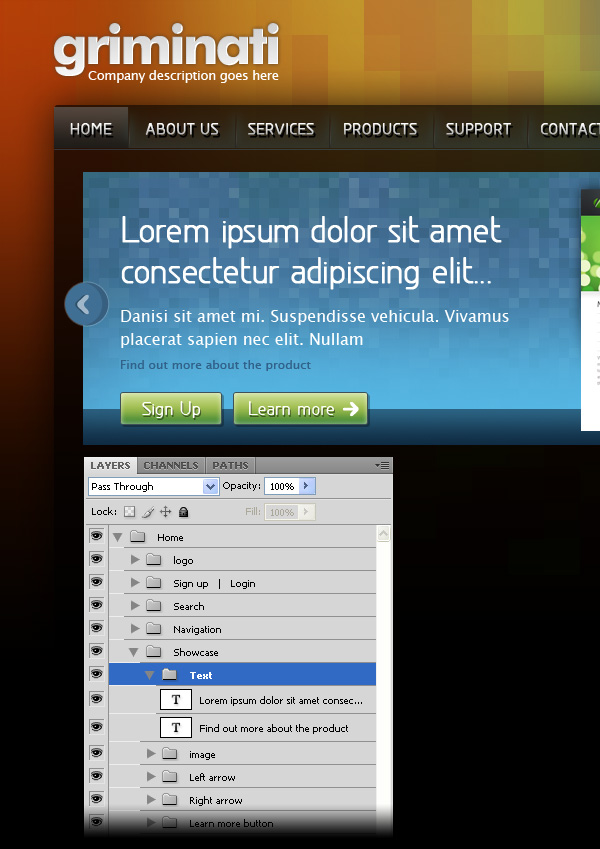 Create a new group (Layer > New > Group), select the Type Tool (T) and add some text. Name this group “text.”
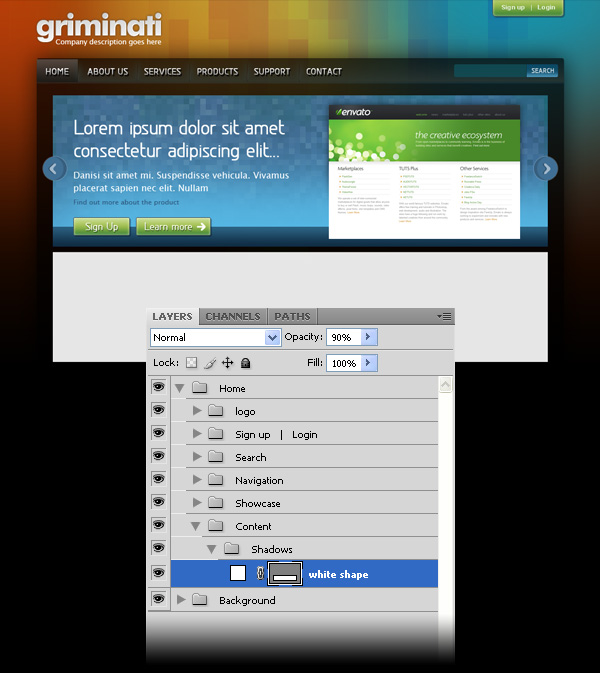 Create a new group and name it “content.” Create another group inside this one and name it “shadows.” Select the Rectangle Tool (U) and create a rectangle like I did using the white color. Name this layer “white shape” and set its opacity to 90%.
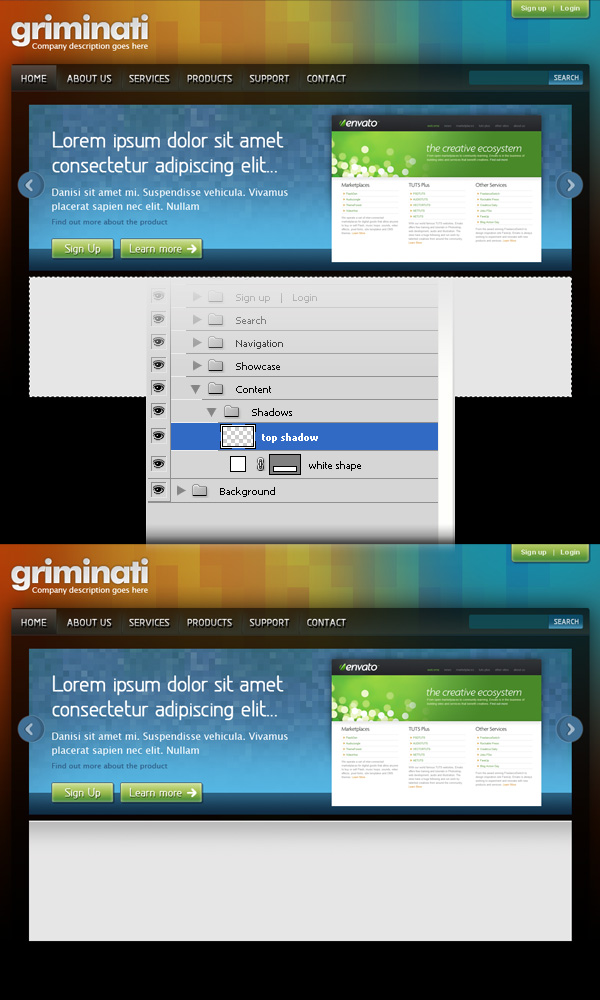 Ctrl-click on the vector mask of the “white shape” layer to select it. Then create a new layer, select the Gradient Tool (G) and draw a gradient #8f8f8f to transparent like I did. Set the opacity of this layer to 50% and name it “top shadow.” Then select the Move Tool (V) and hit the down arrow on your keyboard two times.
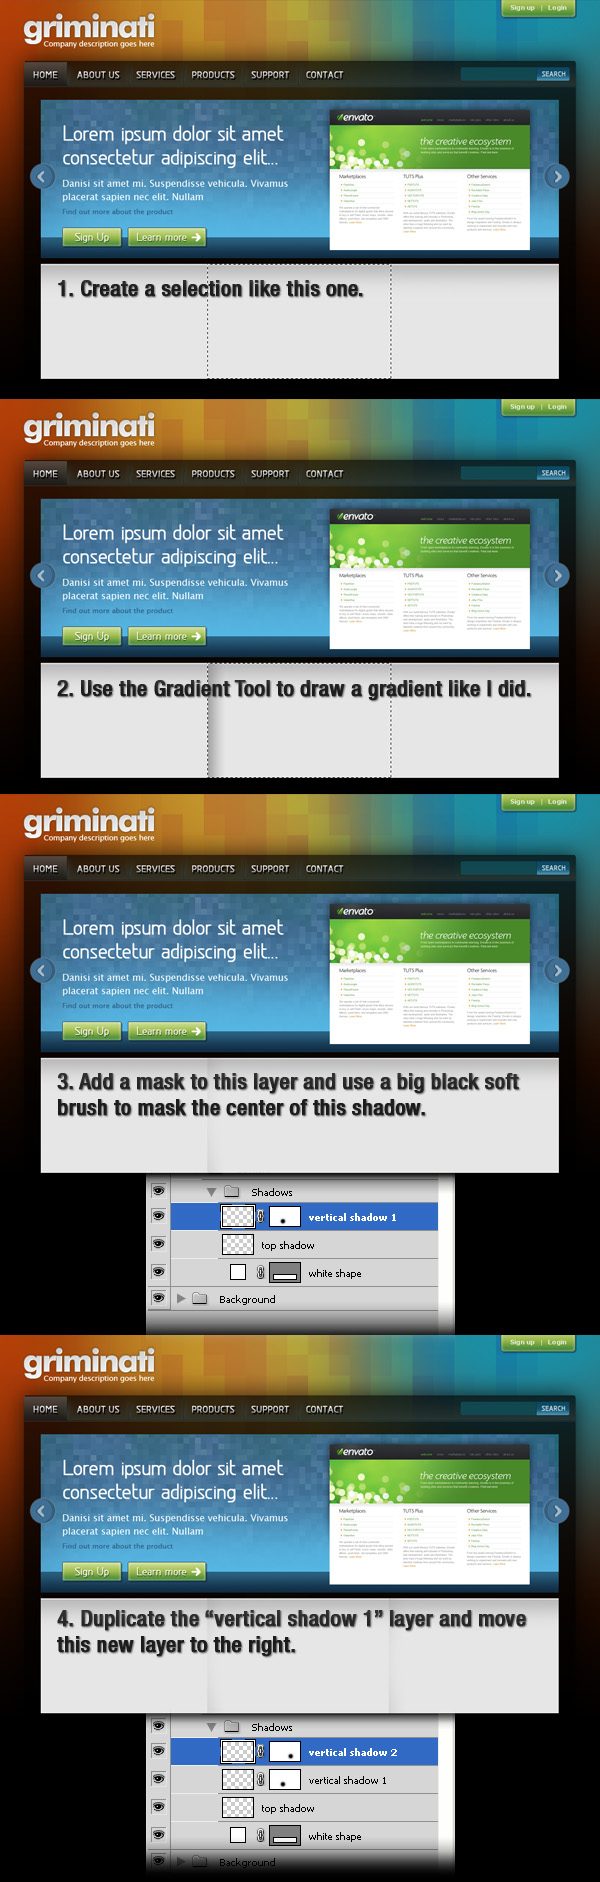 Create a new layer and use the Rectangular Marquee Tool (M) to create a selection like I did. Then use the Gradient Tool (G) to draw a gradient #8f8f8f to transparent like I did. Add a mask to this layer and use a big black soft brush to mask the center of the shadow. Set the opacity of this layer to 30% and name it “vertical shadow 1.” Duplicate this layer (Ctrl+J), name the new layer “vertical shadow 2″ and move it to the right.
 Select the Line Tool (U) and create a horizontal like with the weight of 1 px and the color #aebcc7. Name this layer “line.”
 Select the Type Tool (T) and write the content of your layout. You can also use images and anything else you want.
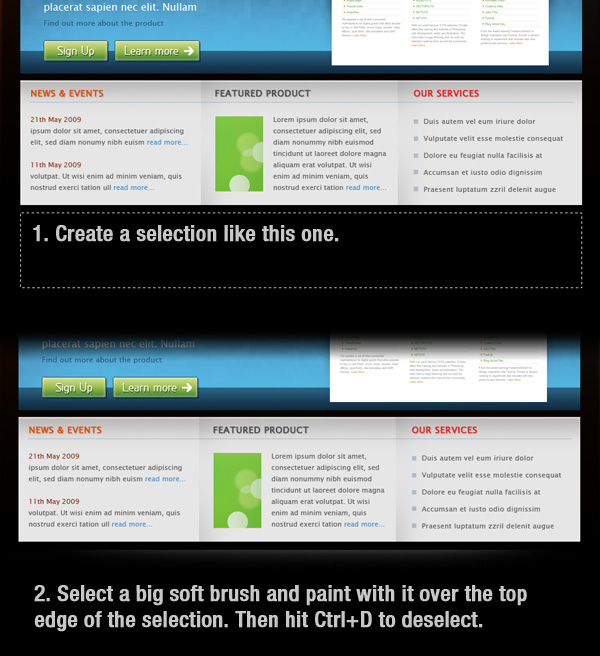 Create a new group and name it “footer.” Create a new layer inside this group, select the Rectangular Marquee Tool (M) and create a selection like I did. Then set the foreground color to #555555, select a big soft brush and paint with it over the top edge of the selection. Set the opacity of this layer to 50% and name it “gradient.”
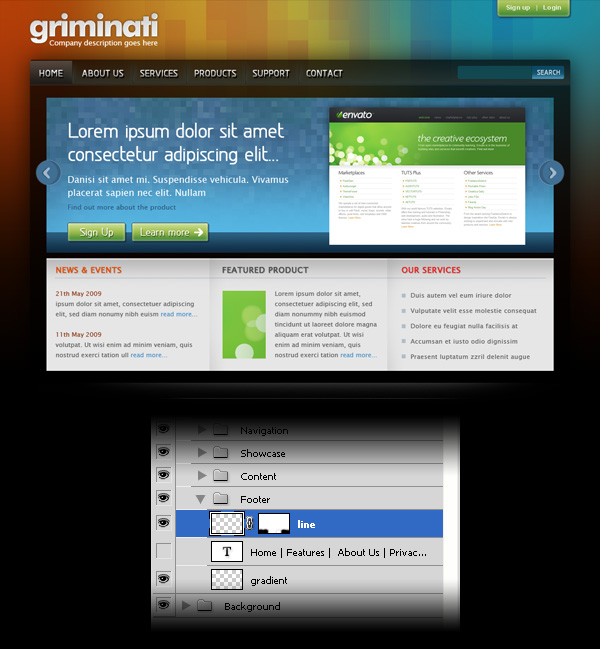 Create a new layer, select the Single Row Marquee Tool and click on your document. Fill the selection with white and hit Ctrl+D to deselect. Go to Layer > Layer Mask > Reveal All, select a big black soft brush and mask this layer like I did. Take a look at the following image for reference. Set the opacity of this layer to 15% and name it “line.”
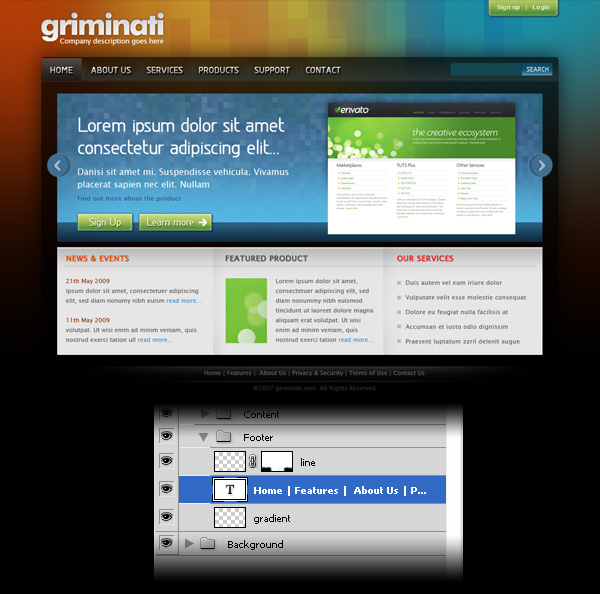 Select the Type Tool (T) and add some text for your footer.
Step 1: Create a new document
Step 2: Add some colors to your background
Step 3: Add a texture to the background
Step 4: Create a dark background for the content
Step 5: Use groups to organize your layers
Step 6: Create more groups
Step 7: Add a logo and a tagline
Step 8: “Sign up” and “login” buttons
Step 9: Create a blue line with the height of 1 px
Step 10: Add a gradient to the navigation bar
Step 11: Write the names of your layout’s pages
Step 12: Create a separator
Step 13
Step 14:
Step 15: Convert the “line 1″ and “line 2″ layers into a smart object
Step 16: Create a blue highlight
Step 17: Create a mask for the “separator” layer
Step 18: Duplicate the separator
Step 19: Group all the separators
Step 20: Create a button for the active page
Step 21: Create the search bar
Step 22: Create the search button
Step 23: Write the word “search” on your button
Step 24: Create a vertical line for the search bar
Step 25: Create a blue rectangle
Step 26: Add a texture to the blue rectangle
Step 27: Add a gradient to the blue rectangle
Step 28: Create a smaller blue rectangle
Step 29: “Sign up” button
Step 30: “Learn more” button
Step 31: Create a button in the left side of the rectangle
Step 32: Create an arrow inside the blue circle
Step 33: Create another arrow in the right side of the rectangle
Step 34: Create a featured image
Step 35: Add a shadow to your image
Step 36: Add some text
Step 37: Create a white rectangle
Step 38: Add a top shadow
Step 39: Create two vertical shadows
Step 40: Create a horizontal line
Step 41: Add some text
Step 42: Create a gradient for the footer
Step 43: Add a line with the height of 1 px to the footer
Step 44: Add some text to your footer
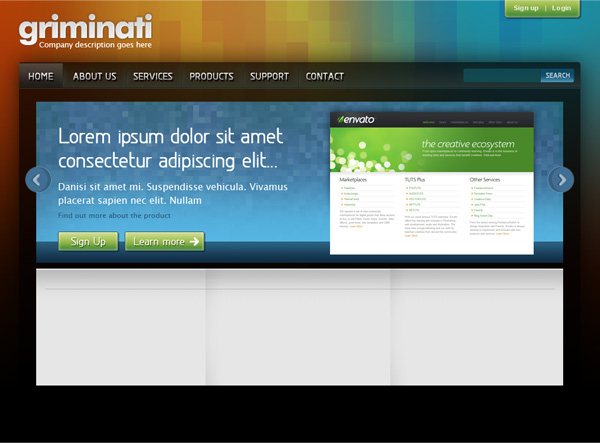
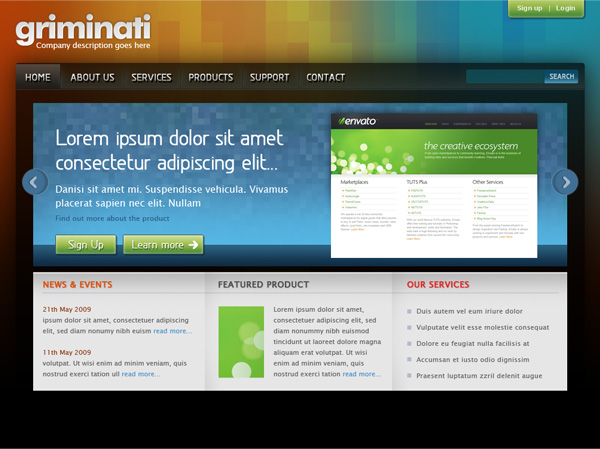
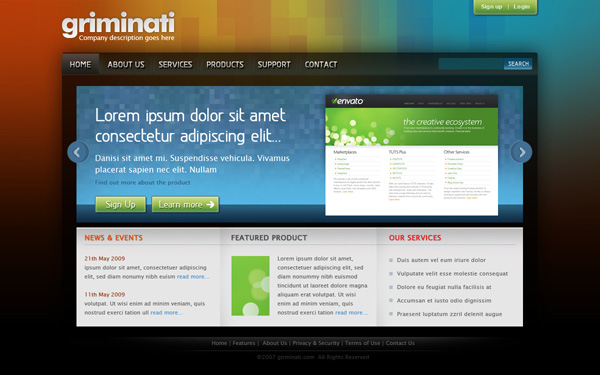
Final Result
Không có nhận xét nào:
Đăng nhận xét